The searchable schedule allows you to filter by hybrid, in-person, or virtual session types. The content/presenters for the in-person sessions may vary slightly from that of their virtual counterparts due to the number of presenters within a session presenting in-person in Anaheim. Every effort was made to mirror the virtual sessions for the in-person event.
- Hybrid Sessions – A select number of sessions will be live-streamed. These will include a mix of in-person and virtual presenters. Unless you have already been notified, your session will not be live-streamed. These will take place on-site in Ballrooms A-E (Convention Center, Level 3) and virtually in Theaters 1-5.
- In-person Sessions – Presenters who are attending in person have been scheduled for an on-site session along with other in-person presenters. Unless your in-person session was also selected as a hybrid session, your on-site meeting rooms will not have internet or phone access to record or stream presentations, and will not be connected to the virtual meeting platform. All presenters, whether live or virtual, will have their prerecorded session included in the virtual meeting schedule. We encourage in-person speakers to also attend these virtual sessions during their scheduled time to participate in the Q&A with virtual attendees. These prerecorded presentations will be available on the virtual platform for three months after the meeting. Your virtual session should not conflict with the in-person session in which you are presenting.
- Virtual Sessions – As previously mentioned, all presenters, including in-person presenters, have provided prerecorded presentations to be included in the virtual session schedule. Prior to the meeting, everyone should have uploaded a recording of their presentation to the virtual meeting platform. At the session start time, everyone will enter the Zoom link. The session chair will make a brief introduction, share their screen, play the first recording, and then hold a Q&A with the first presenter. They will continue this way with all presentations until the end of the session. If a presenter has uploaded a recording but prefers to present live in Zoom, that is fine. All virtual presenters should check their session time again, as some updates have been made to the virtual schedule.
Virtual Session Chairs
A virtual session chair is required to be present at all virtual sessions. If you are planning to chair a session at the in-person meeting and will not be available to chair your virtual session, please designate another virtual presenter who will be present to chair it virtually.
What's New for 2021?
Important Dates
August 1
Abstract Editing Deadline
August 16
Make selection of Meeting Experience (in person or virtual )
August 30
Speaker Registration Deadline
September 13 at 11:59pm Pacific Time
Presentation Upload Deadline
Recording Guidelines
Both in-person and virtual presenters are required to upload your presentation as an MP4 file by September 13 at 11:59pm Pacific Time. We recommend using Zoom to record your presentation, but any platform is fine if you can provide an MP4 file.
All virtual technical sessions will be 90 minutes long. If you were invited by a Session Chair, the length of you recording will be determined by the number of presenters in your session, so please check with your Session Chair. If you submitted a contributed abstract, please record a 15-minute presentation.
View guidelines specific to your session type here.
What will a virtual session look like?
All technical sessions will be 90 minutes long. Before each session, all participants will enter the Zoom room link at the top of the session. The Session Chair will briefly introduce the speakers and then they will share their screen and play the first presentation recording for everyone. Next, they will hold Q&A with the first presenter. This will keep anyone new entering at the same place. It will continue in this way until the last person has presented.
Everyone is required to upload a prerecorded presentation, but if a presenter wishes to present live during their session, that is fine as long as they notify their Session Chair.
How to record a Zoom presentation
Check out a helpful tutorial which walks you through recording your Annual Meeting presentation on Zoom.
https://support.zoom.us/hc/en-us/articles/201362473-Local-recording
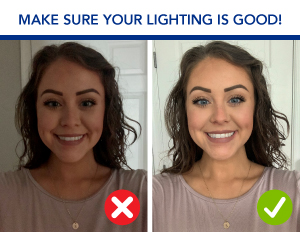
The Power of Good Lighting

- Try to record yourself in a place where there’s bright natural light.
- No window? A bright artificial light will help but be careful where you position it.
- The light source ideally should be behind your laptop or web camera and shining in your direction.
- Adding a white tablecloth can help bounce the light up at your face.
- Position yourself so the light is illuminating as much of your face as possible.
- Also, try to be looking slightly up at the camera rather than down into it. Prop up your laptop on a stack of books if you need to and sit so that your head and shoulders are in the frame. This will help minimize shadows.
- Remember the goal is for your audience to see your face clearly, and with the right tricks, you can make that work anywhere.
Closed captioning
Link to how to use Close Captioning on Zoom
Step 1: If you have access to “Cloud recording” use the Zoom instructions to view and edit the transcript, then download the recording and the “Audio transcript” (VTT file). If you’re using the free Zoom account type, download your recording, and then manually create a WebVTT structured file (see example) or generate your transcript with an easy-to-use video transcription tool — there are many third-party apps, such as Rev and Otter.ai.
Step 2: Use an online tool or software application to hard code the captions to your MP4 video file — tools such as Happy Scribe (online), Hand Brake (free software), and others.
Zoom Backgrounds
If you would like, feel free to download one of the branded Virtual 2020 INFORMS Annual Meeting Zoom backgrounds. You can use these to record your presentation or to use during your scheduled live Q & A session.
To install a Zoom background:
- Click ^ arrow next to “Stop Video” in bottom tool bar of Zoom
- Click “Video Settings”
- On left side navigation, click “Virtual Background”
- To the right of “Choose Virtual Background” click the plus button.
- Click add image.
- Save and select new background.
Note, if in your recording or live your background is displaying backwards, click “Mirror my Video” at bottom of window. Backgrounds work best when you are in front of a plain white wall.
Click on the images below to download the full size graphic for your use.
Video Tips
These recommendations have been established so that your video presentation will look professional, help mitigate stress and ensure that you have the best experience possible.
- Find a quiet, well-lit location
The first part of a good quality video presentation is finding a location where there will be minimal or no interruptions. This area should be quiet, with little chance of there being a lot of background noise. Is should also be well lit, either by a window or a nice bright light. This will ensure that participants will be able to see your face clearly. - Be aware of how your camera and microphone are positioned
- Make sure that you are not sitting right in front of your light source. Position your laptop, or web camera so that the light source is behind it. You should be sitting in the light. Make sure that you are not sitting too close or too far away. Your face should look natural on the screen. Too close and you will be too bright, too far away and you will be in the shadows.
- Your microphone should be positioned so that it is pointed at you and is fairly close so that you can be heard clearly. You want your mic as close as you can get it, so it doesn’t pick up a lot of unwanted noise.
- Position your camera so that it is roughly at the same height as your eyes. If you are using a laptop raise it up so the screen is basically at the same level as your face. Your head and part of your shoulders and chest should be in the shot. Do not position the camera in a way that is showing just your head and neck and you are looking down into your device. One tip is to look at your camera when you are talking, rather than looking at your screen, this helps viewers feel as if you are speaking directly to them.
- Keep your environment simple
Try to keep your background as basic and as clutter free as possible. There can be a few things behind you, but too much and it will detract from the main focus, you. Also be sure to sit in a comfortable chair, this will help minimize the need to shift and keep you on camera. You are also welcome to use the INFORMS background provided to you. - Dress like you would for a conference
You don’t need to wear your fanciest suit, but dress professionally. Avoid small prints such as pin stripes, checks and tiny polka dots. At times those prints can make a screen “dance” and be distracting for views. Avoid pure white or black. Depending on the background, you could blend into it or make it difficult for the camera to focus on you. If you tend to have a shiny face or forehead, a light layer of powder can help minimize it. - Minimize distractions
Another key to having a professional video is to turn off all email, text, and phone notifications before beginning. A simple trick is to put your phone on Airplane mode. If you are in a room that can be closed off, do so. A note can be hung outside stating that you are recording and that there should be no disruptions for the next hour. - Make eye-contact and smile
Remember to make eye-contact, looking at the camera lens will ensure your viewers feel like you’re talking directly with them. You are proud of your hard work and research, so remember to smile. - Practice!
Have a trial run or two beforehand so you know you’ll look and sound great. Being prepared will make you more comfortable and that much more enjoyable to watch.


